
Hi, Knitters,
First I need to announce the winners of the 2 skeins of Made in America Yarns! The winner of a skein of Florafil is MadamMarple - rav id! Hurray! The winner of the skein of American Lamb is chavahsdaughter - rav id! Woo! Hoo! Both winners have been contacted through Ravelry and given instructions on how to get your yarn winnings. Thank you to everyone for entering and I'll have another giveaway, I'm thinking for a book or two, very soon.
Today is a good day for a free hat recipe. As promised I am giving you a quick hat recipe to use up those worsted weight scraps. A recipe for a project is good for this one because I just grabbed some leftover yarns and started in and that's what you'll have to do as well. I don't know the exact amounts of yarns that I used so gather several different colors and dive in. Add more colors as needed as you knit along. I am thinking about 300 yards of worsted weight (it is held doubled throughout) should do it.
To give a brief background on these hats, it all started several years ago. My oldest daughter, Peachy, is now a senior in high school so this has been going on for 4 years now. Each year for the girls high school swim team the girls are all assigned a swim sister. The swim sisters give weekly gifts and posters and general encouragement to each other. I guess it is a form of the buddy system. Now that TC is in high school and part of the team the sister load was doubled. Two of everything!
I have always tried to include a handknit gift or two for the swim sisters. This year I did some super-bulky mittens in team colors and then I gathered up a bunch of worsted weight leftovers and whipped up these adorable earflap hats.
The following is general information to make your own Scrap Happy Hats! Remember this is a sketchy recipe available here on my blog only (I am not making a pdf for this one) and it is free. I hope you are able to understand that I don't have much spare time to answer a lot of questions about this hat pattern. I'll try to make it as straight-forward as possible right here on the blog post for you.
Updated pdf version: Jennifer Patten, a kind and generous blog reader, has made this pattern into a slick 2 page pdf for you to download through my Ravelry pattern shop! It's still free!
Click here for the Ravelry info. and download the pattern!
Updated pdf version: Jennifer Patten, a kind and generous blog reader, has made this pattern into a slick 2 page pdf for you to download through my Ravelry pattern shop! It's still free!
Click here for the Ravelry info. and download the pattern!
Copyright information: As always, please be respectful of copyright and please don't sell my words or work as your own. Charity and fundraising knitting with my patterns is ALWAYS welcome and appreciated.

Scrap Happy Hat
by susan b. anderson
Size: A unisex earflap hat intended for a large child, teen or adult-sized head, will easily fit a head circumference of about 20-23 inches. The hat is supposed to have a generous fit, lengthy and roomy.
Yarn: Worsted weight yarn held doubled. I am guessing it will take about 300 yards or so.
OR
Use 150 yards or so of a super bulky or bulky weight yarn that will get the same gauge!
Suggested yarns:
Quince & Co. Lark
Cascade 220 (wool or superwash)
Lorna's Laces Worsted
Sunshine Yarns Worsted
Quince & Co. Owl
Madelinetosh Worsted
Handspun worsted
Brooklyn Tweed Shelter
Valley Yarns Northampton
Anything goes!
Needles: US size 11 or 13, 16-inch circular and a set of 4 dpns or size to obtain gauge
I used US size 13 for the teen and adult-sized heads and US size 11 for a child's head for a tighter fit
* The samples here are knit on US size 13
Gauge: 3 stitches per inch in stockinette stitch
Materials:
Tape measure
Yarn needle
Detachable stitch markers
Scissors
Pom-pom maker (optional)
Pattern note: This hat is your own creation. Switch and add colors whenever you'd like! Also, switch stitch patterns whenever you'd like! It's all up to you. I used rib, garter, seed stitch, a simple checkered fair-isle stitch pattern, stripes and I threw in a purl row here and there. I am providing the general hat pattern but you will need to fill in the colors and stitch patterns and striping depending on your scrap colors and amounts. Have fun and be creative!
Hat:
With the circular needles and the 2-strands of worsted weight yarn held together, cast on 60 stitches. Join to work in the round being careful not to twist the stitches. Place a stitch marker on the first stitch.
Rnds 1-4: (k2, p2) repeat to the end of the round OR (k1, p1) repeat to the end of the round
Switch to your stripes and various stitch patterns.
Work until the hat measures 7 inches from the cast on edge. Here is where you might want to make the hat shorter if it is for a younger or smaller sized head! The samples are for adult-sized heads and I knit to 7-inches and they fit the girls great.
Decrease for the top of the hat:
*Work onto your double-pointed needles when needed.
Rnd 1: (k4, k2tog) repeat to the end of the round (50 sts remain)
Rnd 2: knit
Rnd 3: (k3, k2tog) repeat to the end of the round (40 sts remain)
Rnd 4: knit
Rnd 5: (k2, k2tog) repeat to the end of the round (30 sts remain)
Rnd 6: knit
Rnd 7: (k1, k2tog) repeat to the end of the round (20 sts remain)
Rnd 8: (k2tog) repeat to the end of the round (10 sts remain)
Cut the yarn and place the end on a yarn needle. Pull the end through the remaining 10 sts and pull up tight to close the hole. Pull the end to the inside, weave in and trim.
Weave in all ends on the inside of the hat and trim.
You don't have to add earflaps to the hat at this point! You could leave it as is.
Earflaps (optional):
Mark the center front of the hat with a stitch marker. I do this by folding the hat in half with the first stitch of the round (and color switching spot) at the back of the hat. Lay the hat flat and find the stitch at the center of the front brim. This is where I put the stitch marker.
Measure 4 inches going toward the back of the hat on both sides of the center stitch marker. Place stitch markers to mark this 4-inch back from the front center marker on both sides. This marks where the earflaps will start on the sides of the hat. Count 12 stitches from the earflap stitch markers and going toward the back of the hat and place a second stitch marker here. Now you have both of the earflaps marked off on your hat.
Use 2 of the double-pointed needles to work back and forth to knit the earflaps. With the right side facing you, attach the earflap yarn (2 strands held double) pick up the 12 stitches along the cast on edge and in between your placed stitch markers for the earflap.
Rows 1-8: knit
Row 9: ssk, knit to the last 2 sts, k2tog
Row 10: knit
Repeat rows 9 and 10 until there are 4 sts remaining.
Bind off.
Cut the yarn and weave in all ends to the wrong side of the hat/earflap and trim.
Repeat for the second earflap.
Optional: Add a pom-pom (2-inch multi-colored poms are used in the samples) or add I-cord ties or twisty ties as you see fit.
Twisty Ties:
To make the twisty rope ties, cut the yarn to be 4 times your desired length (anywhere from 8-12 inches). Hold 3 or 4 different colors together. Fold the strands in half and twist them to the right until they start to wind back up on themselves. Fold in half again and let go. The strands will twist up on themselves to create the rope. Tie an over-hand knot at the end and trim the ends. Tack securely onto the end of the earflap.
And there you have it!!
Click here for the Ravelry project page for Scrap Happy to favorite and queue and post! I'd love to see your version of this hat recipe!
Enjoy your scrappy hats, sweet Knitters:)
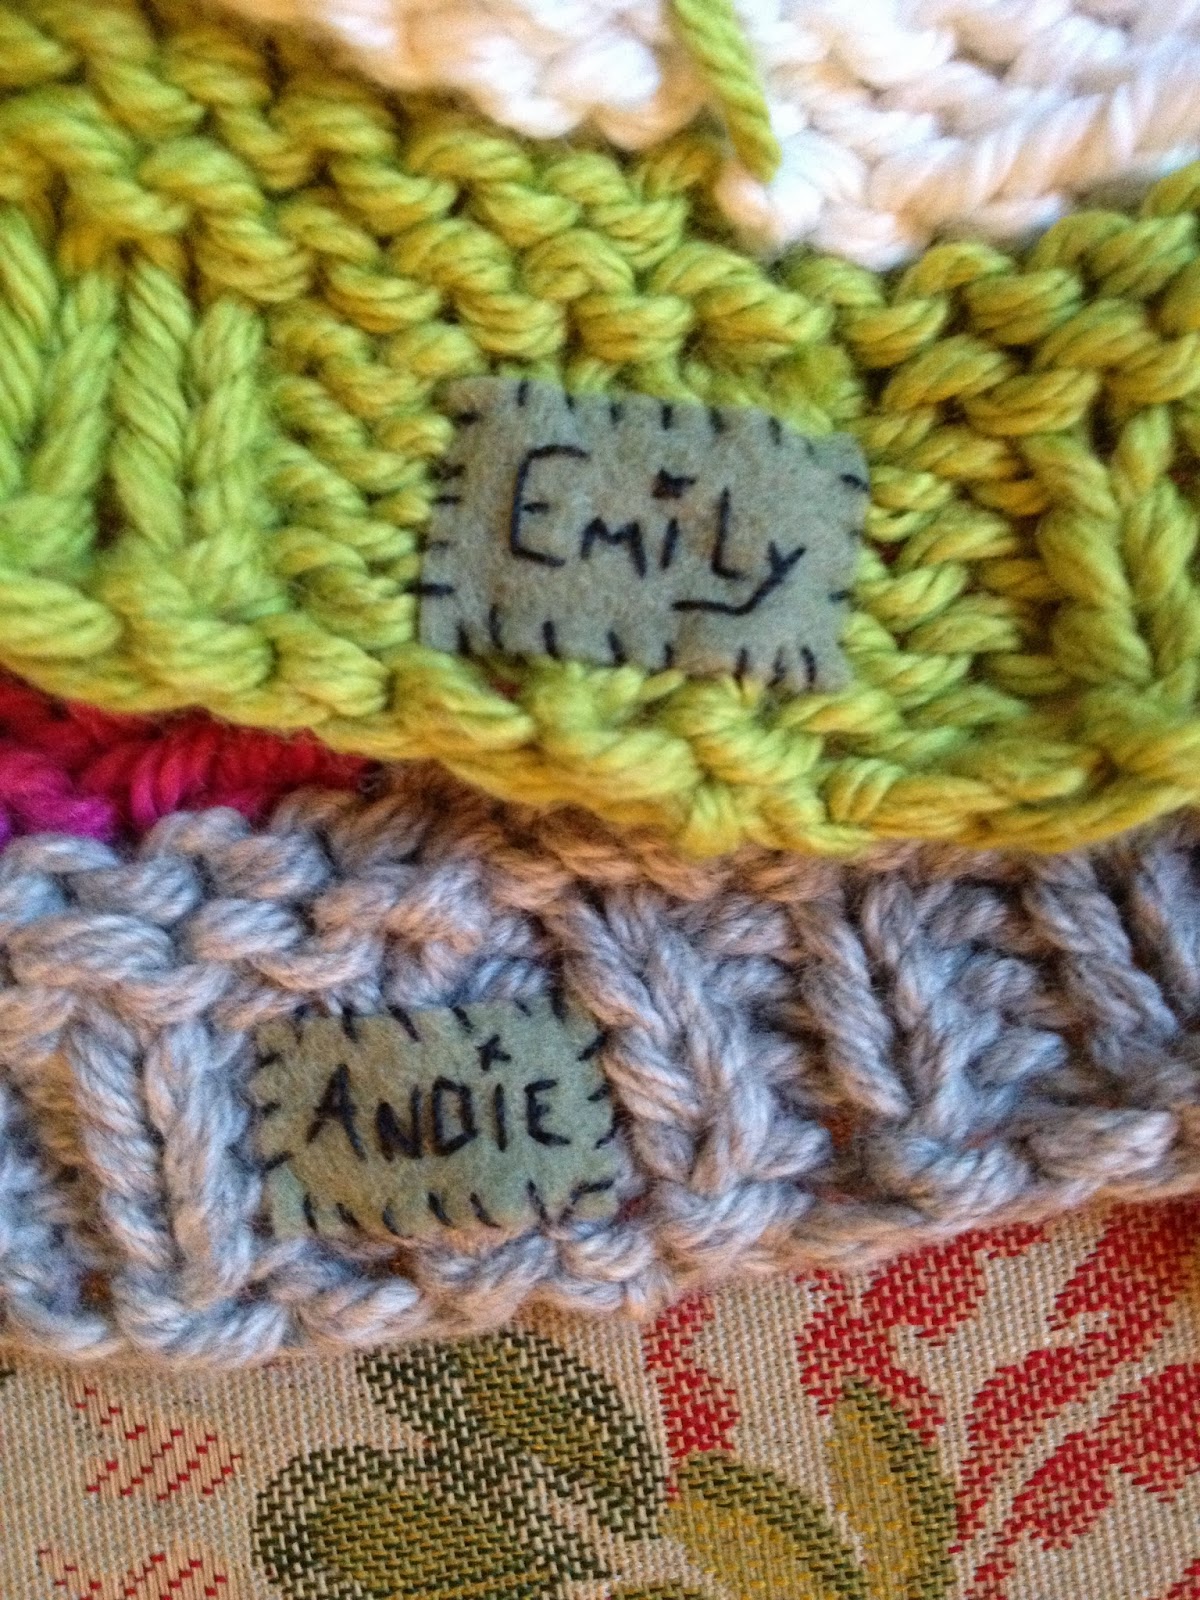
For an added personal touch for the swim sisters, and because for this style of hat it is often difficult to tell the front from the back, I added these sweet little wool felt name-tags. I simply cut a tiny rectangle of felt (yours could be a heart) and took some black sewing thread and a needle and embroidered the girls' names and stitched them onto the inside of the brim to mark the back of the hat. It is all imperfect and perfect at the same time.
Copyright Susan B. Anderson 2013
Love you, Knitters!
best, susie